Belt Squat Guide: Setup, Technique, Benefits and Programming
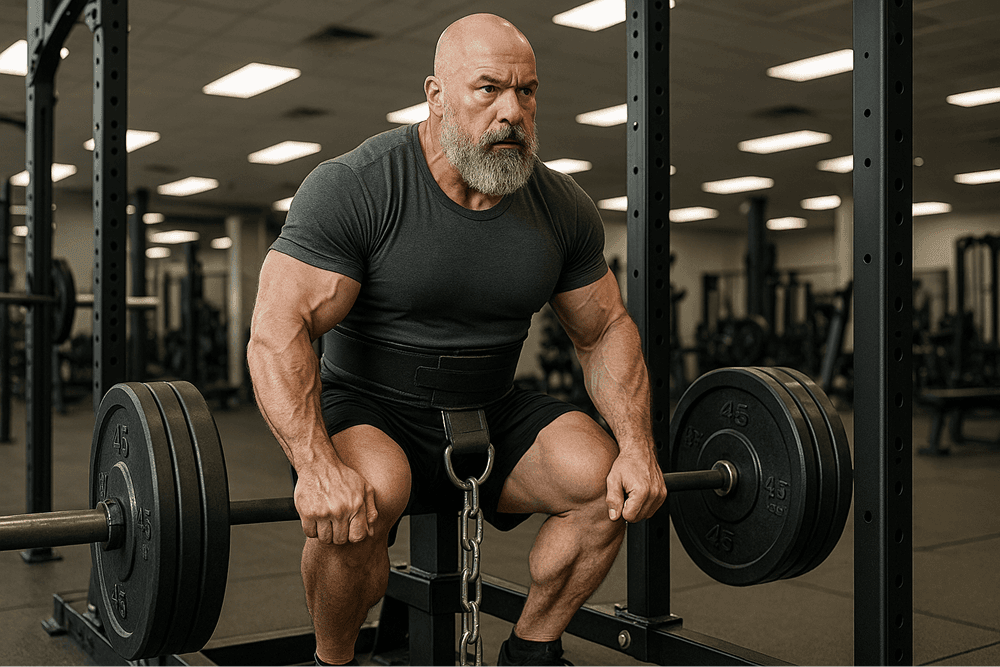
What Is the Belt Squat?
A belt squat applies external resistance through a belt around the hips instead of a bar on the shoulders. This changes the loading demands, but does not eliminate all spinal forces or guarantee pain-free training. An isometric comparison of belt and back squats found lower external low-back moments with belt squats; it did not measure long-term injury risk or establish a rehabilitation protocol.
Unlike traditional barbell squats where weight rests on the upper body, the belt squat creates a direct loading path from the weight to the pelvis. This fundamental difference changes both the movement mechanics and the stress distribution throughout the body, offering distinct advantages for certain training scenarios and populations.
The exercise can be performed using:
Dedicated belt squat machines (like the Pit Shark or Rogue Belt Squat)
Purpose-built loading-pin platforms with appropriate load ratings
Lever-arm attachments on certain power racks
Specialized platforms with built-in belt squat mechanisms
Choose a setup whose operating instructions, load limits and start-and-finish procedure you understand.
Belt Squat Benefits and Limits
Hip-belt loading: avoids supporting a bar across the shoulders and may reduce external low-back demand compared with a back squat
Supported setup: handles and machine safeties can make balancing and reracking easier, depending on the model
Leg-training option: useful when you want a different squat pattern or less upper-body involvement
Equipment-specific mechanics: cable, lever-arm and free-hanging systems can feel very different at the same plate load
A belt squat still loads the hips, knees and trunk. It is not automatically suitable for a disc problem, fracture, knee condition or recovery from injury. Those situations need an individually assessed plan.
How to Perform the Belt Squat: Step-by-Step Technique Guide
Setting Up on a Dedicated Belt Squat Machine
Machine Preparation:
Adjust platform height if applicable
Set safety mechanisms to appropriate height
Check that weight loading mechanism moves freely
Personal Setup:
Step onto elevated platform with feet shoulder-width apart
Fit the belt around the hips as the manufacturer directs; on the Rogue Rhino it sits above the glutes
Connect belt to loading mechanism or weight
Stand tall with neutral spine and braced core
Starting Position:
Feet positioned at shoulder width or slightly wider
Toes angled slightly outward based on hip anatomy (10-30°)
Knees soft (not fully locked)
Torso upright with shoulders pulled back
Arms free or holding handles/rails if available
Execution: Proper Belt Squat Technique
The Descent:
Initiate by breaking at the hips and knees simultaneously
Push hips backward slightly while allowing knees to track forward
Maintain an upright torso position
Lower at a controlled pace; 2–3 seconds is one optional cue, not an established ideal
Lower only as far as you can control while keeping the feet stable and the machine clear
Maintain even weight distribution across entire foot
The Bottom Position:
Use a repeatable depth appropriate to the machine, your control and tolerance
Keep chest up and spine neutral
Avoid excessive forward lean
Ensure knees track in line with toes
Maintain tension throughout the movement
The Ascent:
Drive through mid-foot and heel (avoid rising onto toes)
Push the floor away while extending hips and knees
Keep torso angle consistent until late in the movement
Squeeze glutes at the top position
Return to full standing without hyperextending the knees
Between Repetitions:
Maintain tension and controlled breathing
Reset position if needed without fully relaxing
Ensure belt position remains consistent
Home Belt Squat Setup
Use a purpose-built, load-rated belt-squat platform or manufacturer-approved rack attachment. Check belt, chain, connectors, loading limits, floor stability, clearances and a safe way to start and finish before adding load. Generic box heights and gaps are not a safety specification. Ask the equipment supplier or a qualified trainer to check an unfamiliar setup.
Belt Squat Variations for Different Training Goals
Standard Belt Squat
Foot Position: Shoulder-width stance, moderate toe angle
Depth: A repeatable range you can control on the specific machine
Primary Target: Balanced quad and glute development
Best For: General strength and hypertrophy
Wide-Stance Belt Squat
Foot Position: A somewhat wider comfortable stance, without forcing the hips or knees
Depth: Within the machine clearances and your controlled range
Muscles Involved: Quadriceps, glutes and adductors; emphasis depends on the setup
Useful For: Comparing a different comfortable stance on the same machine
Narrow Belt Squat
Foot Position: Heels under hips, slight toe angle
Depth: Use a controlled depth; the knees may travel forward as required by the setup
Muscles Involved: Knee and hip extensors; a narrower stance is not a guarantee of greater quad growth
Best For: A stance variation to try if comfortable, without assuming lower knee loading
Belt Squat with Pause
Technique: Hold 2-3 seconds at bottom position
Practice Goal: Pausing without bouncing while maintaining control
Useful For: Practicing a repeatable bottom position
Tempo Belt Squat
Technique: Slow eccentric (3-5 seconds down), normal concentric
Practice Goal: Slowing the lowering phase to practice control
Best For: Muscle growth and movement control
Belt Squat Complex
Technique: If using a circuit, finish and rerack the squat before moving to a separate upper-body exercise.
Primary Target: Full-body stimulus with central leg focus
Best For: Metabolic conditioning and time-efficient training
Common Belt Squat Mistakes and How to Fix Them
Incorrect Belt Position
Problem: Belt riding too high on waist or too low on hips Fix:
Follow the belt and machine manufacturer’s hip-placement instructions; avoid a belt that rides up or causes pressure or pinching
Ensure consistent placement between sessions
Consider using a thicker belt for better pressure distribution
Mark proper belt position for consistency if using adjustable belt
Forward Weight Shift
Problem: Rising onto toes during ascent Fix:
Focus on "pushing the floor away" rather than "standing up"
Consciously distribute weight through mid-foot and heel
Check foot position—may need to adjust stance
Practice with lighter weight and conscious heel pressure
Limited Range of Motion
Problem: Not reaching adequate depth Fix:
Use a mirror initially to verify depth
Consider recording sets from the side to assess depth
Gradually increase mobility through dedicated stretching
Use box squat variation to establish consistent depth
Excessive Forward Lean
Problem: Torso tilting forward excessively during descent Fix:
Check belt attachment point (may be too far forward)
Focus on keeping chest up throughout movement
Consider a slightly wider stance for better balance
Practice bracing core before initiating movement
Belt Squat Programming: Sets, Reps and Training Strategies
For Strength Development
Rep Range: 4-8 repetitions
Sets: 4-6 sets
Rest: 2-3 minutes between sets
Loading: Choose a load that permits the planned repetitions with 1–3 reps in reserve; machine-specific percentages are only estimates
Frequency: 1-2 times per week
Example Protocol: 5×5 with progressive loading across weeks
For Hypertrophy (Muscle Growth)
Rep Range: 8-15 repetitions
Sets: 3-5 sets
Rest: About 2 minutes initially; take longer if needed to repeat the planned work
Loading: Select from your demonstrated repetitions on this machine, with a few reps in reserve
Frequency: 1-2 times per week
Example Protocol: 3 × 10 controlled reps, stopping before form deteriorates
For a Deload
If a lighter week fits your training plan, reduce load, sets or both relative to your usual belt-squat work. Rehabilitation is a separate clinical use: a back injury cannot be assigned a generic percentage, rep range or progression from this guide.
For Metabolic Conditioning
Rep Range: 15-25 repetitions
Sets: 2-4 sets
Rest: 30-60 seconds between sets
Loading: A manageable load that leaves a clear margin before technique failure
Frequency: 1 time per week
Example Protocol: 3 rounds of 20 reps paired with upper body movement
Optional Belt Squat Variations for Experienced Lifters
Use one variation when it serves a specific purpose; do not add all of them to your usual workload. More fatigue is not automatically a better training stimulus.
1½ reps: Descend, rise partway, descend again, then stand. Record this as a distinct variation because it is not equivalent to an ordinary repetition.
Paused reps: Pause briefly at a controlled depth without resting the load on an unintended part of the machine.
Drop set: An optional load reduction for experienced lifters with a safe, manufacturer-compatible reracking and reloading procedure. Stop before technique deteriorates.
There is no need to perform 10 × 10, reach failure or chase 100 repetitions to make belt squats useful.
Incorporating Belt Squats Into Your Training Program
As a Main Lower Body Movement
When to Use: For dedicated leg training when the setup is comfortable and appropriate
Programming Approach: Position as first lower body exercise in session
Volume and Intensity: Similar to what you'd use for primary squat variations
Complementary Exercises: Romanian deadlifts, leg curls, calf work
As a Secondary Movement
When to Use: After main barbell movements or on dedicated accessory days
Programming Approach: Moderate to high repetitions with controlled tempo
Volume and Intensity: Fit accessory sets around the primary work instead of automatically adding more volume
Complementary Exercises: Hip thrusts, lunges, leg extensions
If You Are Recovering From Injury
Do not use the sample workouts as rehabilitation prescriptions. Ask the clinician managing the injury whether belt squats are appropriate and what loading and movement limits apply.
For Deload Weeks
When to Use: During planned reduced-loading phases
Programming Approach: Maintain movement pattern with reduced weight
Volume and Intensity: Moderate volume (60-70% of normal) with lighter loads
Complementary Exercises: Light mobility work and active recovery methods
Sample Belt Squat Workout Programs
Lower Body Strength Focus
Belt Squat: 3–5 × 5 at a load that leaves controlled repetitions in reserve
Romanian Deadlift: 4×8 with moderate weight
Bulgarian Split Squat: 3×10 per side
Standing Calf Raise: 4×15
Core work: 3 sets of plank variations
Quad Hypertrophy Emphasis
Belt Squat: 4×12, 10, 8, 15 (pyramid structure)
Leg Press: 3×12 with 2-second pause at bottom
Walking Lunges: 3×20 steps total
Leg Extension: 3×15 with focus on peak contraction
Seated Calf Raise: 4×20
Lower-Volume Training Example
For a healthy lifter choosing a lighter session, an example is 2 controlled belt-squat sets plus a small amount of leg-curl and calf work. Select loads from your current ability and stop before technique deteriorates. This is not an injury-recovery protocol.
Metabolic Conditioning Circuit
Complete 4 rounds with minimal rest between exercises:
Belt Squat: 15 reps
Dumbbell Push Press: 12 reps
Kettlebell Swing: 20 reps
Mountain Climbers: 30 seconds
Rest 90 seconds between rounds
Belt Squat Alternatives When Equipment Is Unavailable
Landmine Squat
Equipment Needed: Barbell and landmine attachment
Execution: Hold end of barbell at chest, perform squat movement
Benefit: A front-held squat with a different loading path from a hip belt
Comparison: Another squat option, not an equivalent loading mechanism
Goblet Squat
Equipment Needed: Kettlebell or dumbbell
Execution: Hold weight at chest and squat with upright torso
Benefit: Accessible front-held squat variation; the trunk still supports the load
Closest Match To: Belt squat's upright posture
Safety Bar Squat
Equipment Needed: Safety squat bar and rack
Execution: Position padded bar across upper back, perform squat
Benefit: Different handles and bar geometry may suit some shoulder positions
Comparison: The load is still carried across the upper back
Front Squat
Equipment Needed: Barbell and rack
Execution: Barbell across front deltoids, elbows high
Benefit: More upright posture than back squat
Closest Match To: Belt squat's torso position and quad emphasis
Who Might Choose a Belt Squat?
A belt squat can suit lifters who want a hip-loaded leg exercise, have difficulty positioning a shoulder-supported bar, or want variety alongside free-weight work. It does not establish suitability for every older lifter or anyone with a back or knee condition. Start with the machine’s instructions and an individually tolerable setup.
Belt Squat for Quads: 2026 Setup Guide
Belt squats train the knee extensors as part of a multi-joint movement. Start with a comfortable stance, stable heel contact and controlled knee travel. The best foot position depends on the attachment and machine geometry; a universal forward-foot or wide-stance rule is not established.
Progress by changing one training variable at a time, such as reps or load, when the current work is controlled and recoverable. ACSM’s 2026 resistance-training guidance supports gradual, goal-specific resistance training; it is guidance for healthy adults rather than a belt-squat rehabilitation prescription.
Repeatable setup: Note stance, belt connection and controlled depth before comparing sessions.
Changing stance: Change one position at a time and judge comfort and control, without assuming a particular growth result.
Optional finisher: 2 sets of 10–15 reps after your main squat or leg press work.
For programming ideas, compare the belt squat with the hack squat and leg press, use it inside a broader leg day plan, or rotate it with other compound lower-body lifts.
Belt Squat FAQ: Common Questions Answered
How does it compare with a back squat?
Hip-belt loading changes the demands and can reduce external low-back moments. Back squats are more specific to barbell-squat competition. Neither is universally safer or better for leg growth.
Can it replace barbell squats?
It can be a main leg exercise if it fits your goals and equipment. If your goal includes improving the barbell squat itself, retain practice of that lift.
What home setup should I use?
Use load-rated equipment designed for the task and follow its manufacturer’s instructions. A pair of improvised boxes is not automatically an adequate platform.
How quickly should I add weight?
Progress when you can meet your planned reps with repeatable technique and the intended effort. There is no guaranteed weekly percentage increase.
Can I use it with knee or back problems?
The belt squat still loads these areas. Get individual guidance if you have an injury or a condition that affects training; reduced external back loading does not establish clinical suitability.
How high should a platform be?
Use the specified platform and required clearances for your equipment. Verify that the load can move freely and that you can start and rerack without a precarious step.
Conclusion: Making the Belt Squat Work for Your Training Goals
The belt squat offers a useful alternative loading setup for leg training. Choose it for how it fits your goal, equipment and tolerance. It does not remove all spinal loading, guarantee injury prevention or replace an individualized rehabilitation plan.
Belt Squat for Quads: How to Bias the Front of Your Legs
Belt-squat mechanics vary with the attachment and your position relative to it. Try a comfortable stance with the heels supported and allow controlled knee travel, rather than forcing a particular torso angle. The cited isometric belt-squat study supports a change in joint loading, not a claim of greater long-term quad growth without injury risk.
For exercise variety, compare the hack squat and leg press with a belt squat, or consider a pendulum squat. Their supports and loading paths differ; none can be assumed to remove back loading.
Belt Squat Programming: Sets, Reps and Weekly Volume (2026 Guidelines)
Belt squats still create fatigue. Treat the following as alternative examples for a healthy lifter, not additions to every workout above, and adjust them to your other leg work:
Strength focus: 4-5 sets of 5-8 reps, 2-3 minutes rest, twice per week.
Hypertrophy focus: 3-4 sets of 10-15 reps taken within 1-2 reps of failure.
Optional lighter week: 3 sets of 12-15 reps at a moderate load with fewer sets or a lower load than usual; this is not rehabilitation guidance.
Track the machine, belt connection, load, reps and depth so you compare like sessions. Two weekly exposures can be convenient, but are not inherently superior for growth when volume is matched; the 2019 frequency meta-analysis provides that qualification.
Belt Squat: Loading Questions
Is it good for building quads?
It can train the quadriceps effectively, alongside other hip and knee extensors. The best option depends on the machine, your training plan and tolerance.
Can it replace a back squat?
It may replace it for a general leg-training goal, but is not equivalent practice for a barbell-squat strength goal.
How heavy should I go?
Use a load you can control for the planned reps while leaving a margin before technique failure. Learn the safeties and reracking procedure first; do not push to failure on the assumption that the spine is unloaded.
